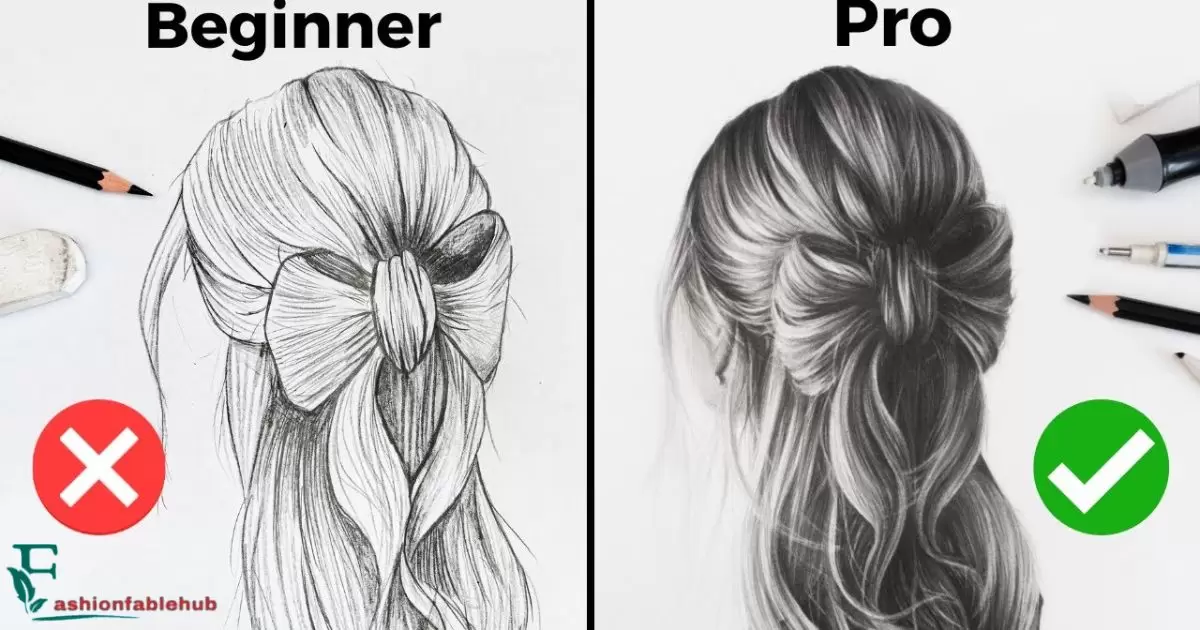
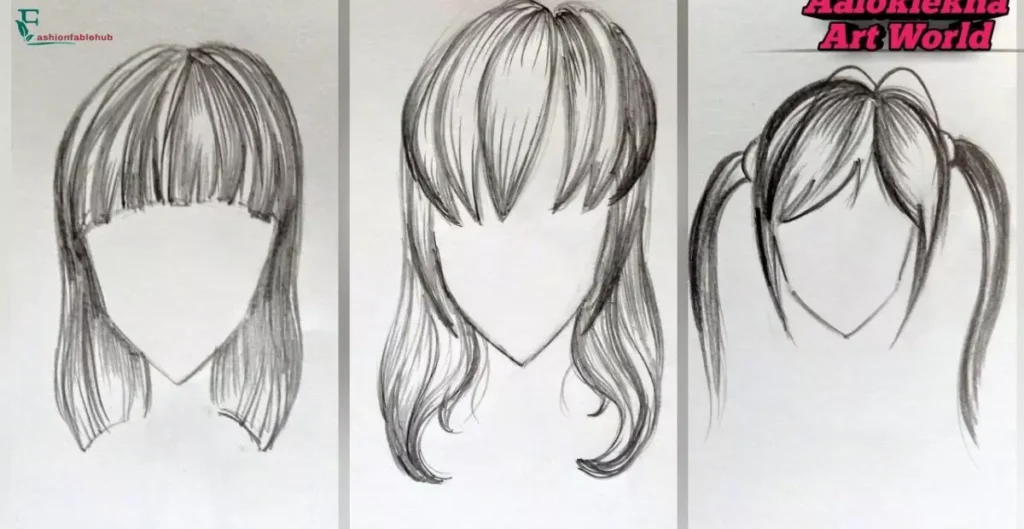
Drawing hair requires a systematic approach to capture its intricate details and texture. Begin by defining the outer contour of the hair, paying attention to its overall shape and flow. Next, break down the hair into clumps or sections, observing their arrangement and direction.
Develop the volume and depth through shading techniques, carefully considering areas of light, shadow, and mid-tones. Finally, add texture to the hair by drawing individual strands and using various pencil strokes to mimic its natural pattern. With practice and observation, you can master the art of drawing hair with confidence.
Drawing Hair – The Four-Step Approach
Step One – Define the Outer Contour of the Hair
To accurately depict hair, it’s essential to start by defining its outer contour. Begin by sketching the basic shape of the hairstyle using light, loose lines. Pay attention to the direction and flow of the hair, capturing its overall shape and silhouette. Use reference images or real-life observation to guide your understanding of different hairstyles.
Step Two – Draw Shapes for the “Clumps” of Hair
Next, break down the hair into smaller sections or “clumps.” Observe how hair tends to group together and form distinct shapes. Using a combination of curved and straight lines, sketch these clumps, paying attention to their arrangement and spacing. This step helps create a sense of volume and structure in the hair.
Step Three – Developing the Volume Through Value
To add depth and dimension to your hair drawing, focus on shading and value. Observe how light falls on the hair and identify areas of light, shadow, and mid-tones. Use graphite shading techniques such as hatching, cross-hatching, and stippling to create the illusion of volume. Gradually build up layers of shading, paying attention to the direction of the hair strands.
Step Four – Draw the Texture of the Hair
Texture plays a crucial role in capturing the realism of hair. Whether it’s smooth and straight or curly and textured, understanding the texture is key. Pay attention to the individual strands and their patterns. Use your pencil to create fine lines and strokes that mimic the texture of the hair. Vary the pressure and thickness of your lines to add depth and dimension.
Drawing a Strand of Hair
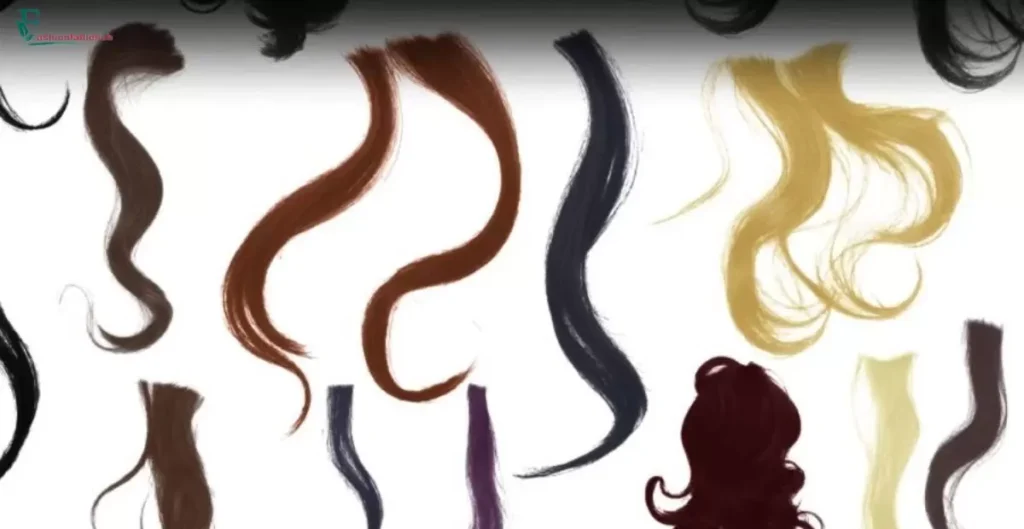
Mastering the art of drawing individual strands of hair can elevate your hair drawings to the next level. Here’s a step-by-step approach to drawing a single strand:
- Begin by lightly sketching the basic shape of the strand using a thin, light line.
- Observe the curve and flow of the strand. Hair strands often have a slight curve or wave.
- With a darker pencil or increased pressure, define the edges of the strand, gradually thickening the line towards the base.
- Use hatching or cross-hatching techniques to add shading and create the illusion of depth. Pay attention to the direction of the strands and adjust your shading accordingly.
- Use an eraser to gently lift off some highlights along the strand, adding a touch of realism.
Drawing Straight Hair
Drawing straight hair requires capturing its sleekness and smooth texture. Here are some tips to draw straight hair effectively:
- Start by establishing the overall shape and contour of the hairstyle. Straight hair tends to flow downwards, so consider the direction and length of the strands.
- Use long, smooth strokes to outline the hair, keeping the lines clean and precise.
- Pay attention to the highlights and reflections on the hair. Straight hair often reflects light, creating shiny areas that can be emphasized in your drawing.
- Gradually build up the shading, focusing on the areas of shadow and adding subtle variations in value to create a realistic effect.
How to Draw Curly Hair
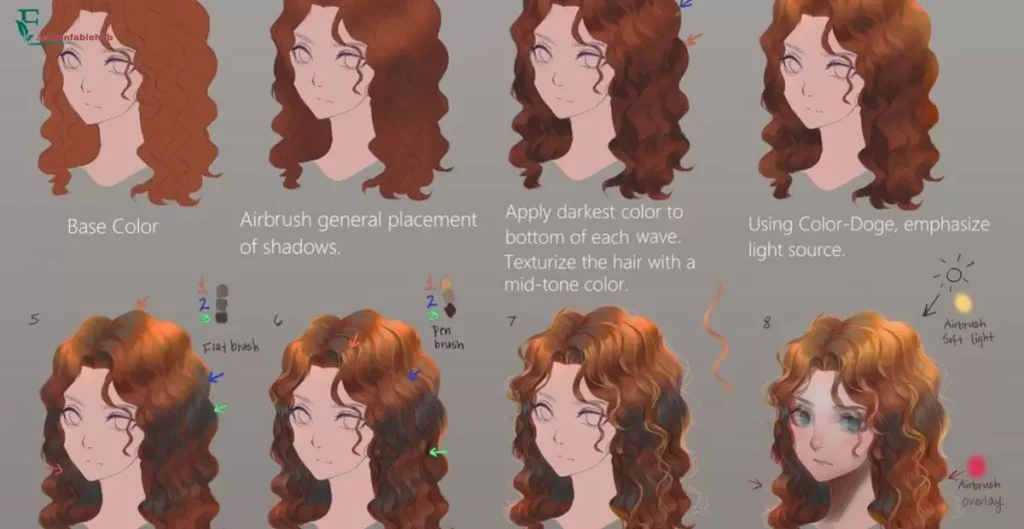
Curly hair offers a unique set of challenges due to its intricate texture and varied patterns. Here’s a guide to drawing curly hair:
- Begin by establishing the general shape and volume of the hairstyle. Curly hair tends to have more volume and movement, so consider the overall silhouette.
- Use loose, flowing lines to sketch the curls, paying attention to their size, shape, and direction.
- Emphasize the curls by adding shading and depth. Curly hair often has areas of shadow and highlights due to its complex texture. Use hatching and blending techniques to create the illusion of curls.
- Experiment with different pencil strokes to capture the natural texture and variation in the curls. Vary the thickness and direction of your lines to add realism.
Different Approaches
When it comes to drawing hair, artists employ various techniques and styles. Here are a few different approaches you can explore:
- Realism: Focus on capturing the intricate details, texture, and volume of the hair. Use precise shading techniques and pay close attention to the subtle variations in value.
- Expressive: Take a more stylized approach, emphasizing the movement and flow of the hair. Use bold, dynamic lines and exaggerated shapes to convey a sense of energy.
- Minimalistic: Simplify the hair and focus on its essential elements. Use clean lines and minimal shading to create a more graphic representation ofhair.
Another Example – Step by Step
Let’s walk through an example of drawing hair step by step:
- Start by sketching the overall shape and contour of the hairstyle using light, loose lines.
- Break down the hair into clumps or sections, observing their arrangement and direction.
- Begin adding shading to create volume and depth. Pay attention to areas of light, shadow, and mid-tones.
- Refine the details by drawing individual strands and adding texture to the hair.
- Continue building up the shading and texture, adjusting as necessary to achieve the desired effect.
- Use an eraser to lift off highlights and add further dimension.
How do you draw hair for beginners?
For beginners, drawing hair can seem daunting, but with practice and patience, it becomes more manageable. Here are some tips for beginners:
- Start with basic shapes: Begin by sketching simple shapes to establish the overall structure of the hair. This helps in understanding the flow and direction.
- Observe real-life references: Study photographs or observe people with different hairstyles. Pay attention to how the hair falls and the patterns it creates.
- Break it down: Instead of trying to draw every strand, focus on capturing the essence of the hair by breaking it down into clumps or sections.
- Practice shading: Shading is essential for adding depth and volume to hair. Experiment with different shading techniques, such as hatching and blending, to create realistic effects.
- Study different hair types: Explore various hair types, from straight to curly, and practice drawing each type to improve your understanding of their unique characteristics.
How do you draw a head with hair?
Drawing a head with hair involves combining the knowledge of facial proportions and hair drawing techniques. Here’s a simplified approach:
- Begin by sketching the basic shape of the head using simple geometric forms, such as circles or ovals.
- Add guidelines to establish the positioning of facial features, such as the eyes, nose, and mouth.
- Use the previously mentioned techniques to draw the hair around the head, considering the hairstyle and hairline.
- Pay attention to the interaction between the hair and the face, ensuring that the hair complements the facial features and adds a sense of realism.
How do you draw realistic hair digitally?
Drawing realistic hair digitally can be achieved using various software and tools. Here are some general tips:
- Use appropriate brushes: Experiment with different brush types, such as textured brushes or brushes that mimic natural media, to create realistic hair textures.
- Layering and opacity: Build up the hair gradually using layers, adjusting the opacity to create depth and variation in color and value.
- Observe real hair: Refer to reference images or study real hair to understand its characteristics and replicate them digitally.
- Utilize blending modes: Experiment with blending modes to achieve more natural transitions between colors and values.
- Practice with digital tools: Take the time to explore the features and capabilities of your digital drawing software to maximize your creative potential.
How do you draw fluffy hair?
- Start with the basic shape: Sketch the overall shape of the hair, keeping it loose and fluffy in appearance.
- Use curved and flowing lines: Fluffy hair often has a lot of volume and movement. Incorporate curved lines to depict its softness and texture.
- Add volume with shading: Use shading techniques to create volume and depth. Pay attention to areas of light and shadow to bring out the fluffiness.
- Create texture: Use small, delicate strokes to add texture and detail to the hair. This helps convey the softness and fluffiness of the hair strands.
Conclusion
Drawing hair requires a combination of observation, technique, and practice. By following the step-by-step approaches outlined in this guide, you can improve your ability to draw hair realistically. Remember to study different hair types, experiment with shading techniques, and allow yourself room for creativity. With time and dedication, you’ll be able to capture the beauty and intricacies of hair in your artwork.
Note: This blog post is intended to provide guidance and tips for drawing hair. It is always beneficial to practice regularly and explore different styles and techniques to develop your own unique approach to drawing hair.